-
I've Found a Baby Bird!
Use this quick step-by-step guide to find out if the bird you've found needs help, and if so where to find assistance.
-
What Should I Do...?
Useful information on how to resolve some common situations involving altricial baby birds.
-
How Can I Help?
There are many ways that you can make a critical difference for baby birds. Please take action today!
-
In My Neighbourhood
A guide to the wonderful and varied baby birds you can find right in your own back yard!
-
About T.W.C.
Since 1993, Toronto Wildlife Centre has helped many thousands of wild animals in need. Find out more about the work we do.
HelpBabyBirds.ca
Copyright © 2010 Toronto Wildlife Centre.
What Should I Do...?
... if an entire nest of birds has fallen?
If the babies are alert and healthy, nests should be replaced in their original location, or in cases where nests have been removed due to conflict (e.g., noise from the babies, construction, concern about feces from the nest), they can be replaced close to the original location using a false nest. Parents will accept babies that have been handled by humans, though handling should be kept to a minimum to avoid frightening the babies.
Use the guidelines below to build a false nest.
Note that although birds sometimes nest in locations inconvenient for people, they typically do not cause damage and remain in the nest for a very short time, usually 2-3 weeks. After this time, the babies leave the nest and do not return, at which point the nesting material can be removed and the entrance hole covered with 1/2 inch wire mesh to prevent future nesting.
For replacing cup-shaped nests in trees, shrubs, or on eavestroughs or other flat surfaces:
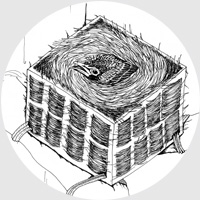
- Step 1: Obtain an open plastic container - a large margarine tub usually works well, or a berry basket - to use as the base for the new nest. Poke holes in the bottom if there are none to allow for moisture drainage.
- Step 2: Pack nesting material into the container. If you have remnants of the original nest, this is ideal. If not, use dry grass packed tightly into the container. Push the nesting material down in the middle and up around the sides to form a cup shape just large enough to contain the babies snugly.
- Step 3: Thread several pieces of wire into a hole on the bottom of the container and out through another hole. These will become fasteners that can be used to wire the new nest in the original nest location.
- Step 4: Attach the new nest to the location of the original nest if you can safely access it, or near it an area sheltered from direct sunlight and rain. It is important that the nest be as close as possible to the original since parent birds identify their babies by location. If you are not sure of the original location, look for signs such as remnants of nesting material or accumulation of feces to make your best guess.
- Step 5: Once the nest is securely in place, tuck the baby or babies firmly into it. Make sure that the babies are sitting upright with their legs tucked underneath them, and that the sides of the nest support the babies in this position.
- Step 6: Leave the area and monitor from a distance for 1-2 hours to see if the parents return to care for the babies. If there is no sign of any adults coming to the nest within that time period, contact a wildlife rehabilitator.
For replacing nests built in crevices (e.g. vent shafts, holes in buildings):
House sparrows and starlings, two common urban species, use this type of nest.
Photo courtesy AAA Gates' Wildlife Control.
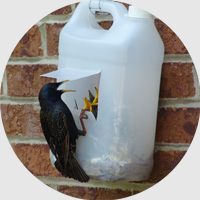
- Step 1: Obtain a large plastic jug - a windshield wiper fluid/antifreeze bottle works well. You can also use a gallon milk jug or two-litre pop bottle (though pop bottles are usually too small for a full nest of starlings). Make sure the container is thoroughly rinsed and dried.
- Step 2: Poke holes in the bottom to allow for moisture drainage.
- Step 3: Cut a square section on the side of the container 2-3 inches from the bottom. Only cut three sides of the square - the bottom and the two sides. Leave the top of the square attached, so that the cut flap can be pulled up from the bottle to form an awning. The square should be about two inches on all sides to allow the parent birds to perch on the edge and feed their young.
- Step 4: Pack nesting material into the container. If you have remnants of the original nest, this is ideal. If not, use dry grass packed tightly into the container. The nesting material should be packed in tightly to better support the babies. Push the nesting material down in the middle and up around the sides to form a cup shape just large enough to contain the babies snugly. The bottom of the “cup” should be about one inch below the bottom of the cut hole.
- Step 5: Secure a piece of wire around the top of the container (if it is a jug with a handle, wrap the wire around the handle. If not, poke two holes on opposite sides of the top of the jug and thread a piece of wire through). This wire will become a fastener that can be used to wire the new nest in the original nest location.
- Step 6: Attach the new nest as close you can to the entry point of the original nest if you can safely access it. (If possible, hang it right overtop of the original entrance point.) It is important that the nest be as close as possible to the original since parent birds identify their babies by location. If you are not sure of the original location, look for signs such as remnants of nesting material or accumulation of feces to make your best guess.
- Step 7: Once the nest is securely in place, tuck the baby or babies firmly into it. Make sure that the babies are sitting upright with their legs tucked underneath them. The babies should be sitting high enough that you can see their heads through the hole you have cut. Monitor from a distance for 1-2 hours to see if the parents return to care for the babies. If there is no sign of any adults coming to the nest within that time period, contact a wildlife rehabilitator.
If you cannot access the nest area, or the parents do not return to feed the babies within one hour, contact a wildlife rehabilitator.